Alles: Build a Wi-Fi Mesh of Synthesizer Speakers
Original writeup by Brian Whitman and Shore Pine and contributors
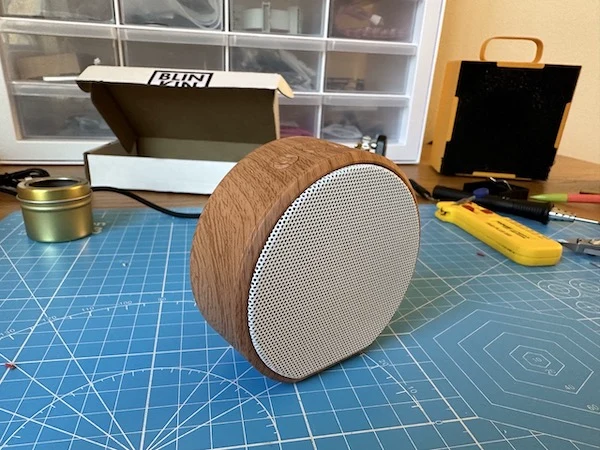
Photo credit
pics/speaker_assembly/11.jpeg
Brian Whitman, Shore Pine and contributors · MITResized without cropping and converted to WebP.
Before you build
Build one speaker first, then explore sending different voices to a whole network. This republication includes the original hardware overview, illustrated speaker assembly, flashing instructions, and substantial programming tutorial, not just the introductory README. The source also explains software-only clients, so you can explore the protocol before buying hardware. Its mesh is designed around synchronized playback rather than immediate low-latency instrument response. The guide's latency, Wi-Fi reliability, PCB sales, and price statements belong to the pinned original version. External manufacturer diagrams and video thumbnails are linked rather than relicensed.
Brian Whitman's distributed synth, with the full README, speaker-shell assembly photographs, ESP32 flashing guide, Python tutorial, and original wiring and sound-programming examples.
Alles - the mesh synthesizer
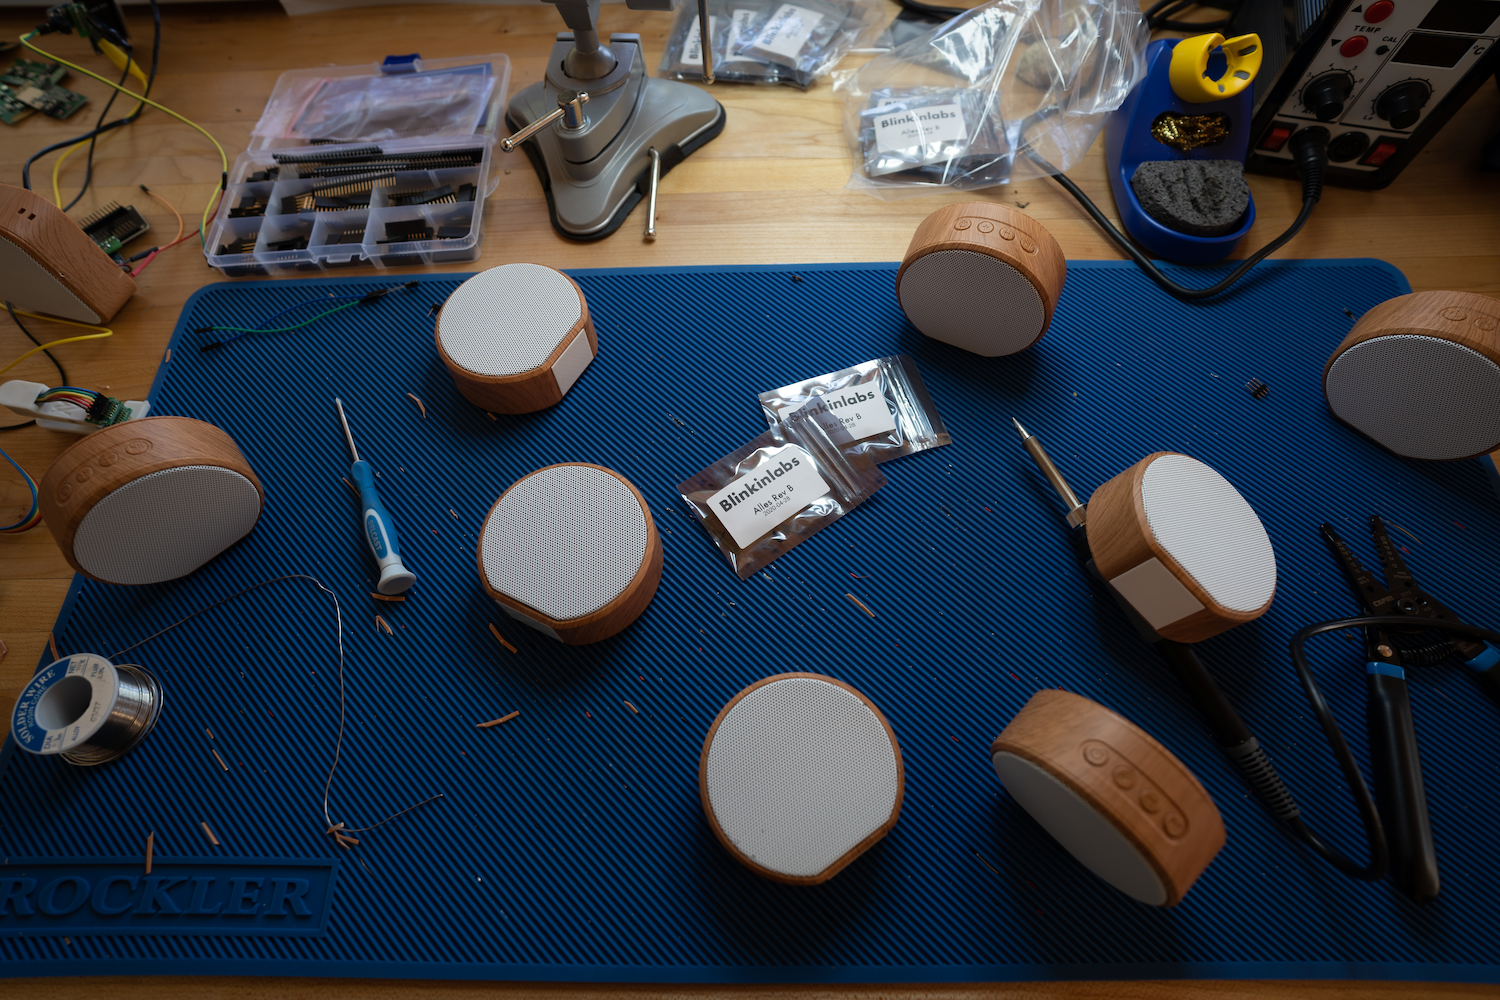
Photo credit
shore pine sound systems discord Chat about Alles on our Discord!
Check out this video!
The Alles mesh networking synthesizer - a field of sound at your control
Alles is a many-speaker distributed mesh synthesizer that responds over WiFi. Each synth -- there can be hundreds in a mesh -- supports up to 120 additive oscillators, with filters, modulation / LFOs and ADSRs per oscillator. The mesh of speakers can be composed of any combination of our custom hardware speakers or programs running on computers. The software and hardware are open source: you can build it yourself or buy a PCB from us.
The synthesizers automatically form a mesh and listen to multicast WiFi messages. You can control the mesh from a host computer using any programming language or environments like Max or Pd.
We intended their first use as distributed / spatial version of an Alles Machine / Atari AMY additive synthesizer where each speaker represents up to 64 partials, all controlled as a group or individually. But you can just treat them as dozens of individual synthesizers and do whatever you want with them. It's pretty fun!
Want to try it today? Build your own Alles, or install the software version, and then read our getting started tutorial!
Synthesizer specs
Each individual synth is powered by the AMY synthesizer library, you can read more details there.
Using it -- hardware Alles
On first boot, each hardware speaker will create a captive wifi network called alles-synth-X where X is some ID of the synth. Join it (preferably on a mobile device), and you should get redirected to a captive wifi setup page. If not, go to http://10.10.0.1 in your browser after joining the network. Once you tell each synth what the wifi SSID and password you want it to join are, it will reboot. You only need to do that once per synth.
Using it -- software Alles
If you don't want to build or buy an Alles speaker, you can run Alles locally on your computer(s), as many as you want. As long as each copy of the software is running within the same network, they will automatically form in the mesh just like the hardware speakers. And the hardware and software speakers can be used interchangeably.
To build and run alles on a computer, simply clone this repository and
$ cd alles/main
$ make
$ ./alles
$ ./alles -h # shows all the useful commandline parameters, like changing which channel/sound card, or source IP address
Controlling the mesh
Check out our brand new Getting Started page for a tutorial!
You can control every synth on the mesh from a single host, using UDP over WiFi. You can address any synth in the mesh or all of them at once with one message, or use groups. This method can be used in music environments like Max or Pd, or by musicians or developers using languages like Python, or for plug-in developers who want to bridge Alles's full features to DAWs.
Alles's wire protocol is a series of numbers delimited by ascii characters that define all possible parameters of an oscillator. This is a design decision intended to make using Alles from any sort of environment as easy as possible, with no data structure or parsing overhead on the client. It's also readable and compact, far more expressive than MIDI and can be sent over network links, UARTs, or as arguments to functions or commands.
Alles accepts commands in ASCII, each command separated with a Z (you can group multiple messages in one, to avoid network overhead if that's your transport). Like so:
v0w4f440.0l0.9Z
See AMY's readme for the full list of synth parameters.
alles.py
Alles comes with its own full-featured client, written in Python. Feel free to adapt it or use it in your own clients. It can be seen as documentation, an API as well as a testing suite. You simply import alles and can control the entire mesh.
$ python3
>>> import alles
>>> alles.drums() # plays a drum pattern on all synths
>>> alles.drums(client=2) # just on one
To see more examples, check out our brand new Getting Started page.
Addressing individual synthesizers
By default, a message is played by all booted synthesizers. But you can address them individually or in groups using the client parameter.
The synthesizers form a mesh that self-identify who is running. They get auto-addressed client_ids starting at 0 through 255. The first synth to be booted in the mesh gets 0, then 1, and so on. If a synth is shut off or otherwise no longer sends a heartbeat signal to the mesh, the client_ids will reform so that they are always contiguous. A synth may take 10-20 seconds to join the mesh and get assigned a client_id after booting, but it will immediately receive messages sent to all synths.
The client parameter wraps around given the number of booted synthesizers to make it easy on the composer. If you have 6 booted synths, a client of 0 only reaches the first synth, 1 only reaches the 2nd synth, and a client of 7 reaches the 2nd synth (7 % 6 = 1).
Setting client to a number greater than 255 allows you to address groups. For example, a client of 257 performs the following check on each booted synthesizer: my_client_id % (client-255) == 0. This would only address every other synthesizer. A client of 259 would address every fourth synthesizer, and so on.
You can read the heartbeat messages on your host if you want to enumerate the synthesizers locally, see sync below.
Timing & latency
Alles is not designed as a low latency real-time performance instrument, where your actions have an immediate effect on the sound. Changes you make on the host will take a fixed latency -- currently set at 1000ms by default -- to get to every synth. This fixed latency ensures that messages arrive to every synth -- both ESP32 based and those running on computers -- in the mesh in time to play in perfect sync, even though Wi-Fi's transmission latency varies widely. This allows you to have millisecond-accurate timing in your performance across dozens of speakers in a large space.
Your host should send along the time parameter of the relative time when you expect the sound to play. I'd suggest using the number of milliseconds since your host started, e.g. in Python:
def millis():
    d = datetime.datetime.now()
    return int((datetime.datetime.utcnow() - datetime.datetime(d.year, d.month, d.day)).total_seconds()*1000)
If you're using alles.py, we do this for you!
If using Max, use the cpuclock object as the time parameter.
The first time you send a message with time the synth mesh uses it to figure out the delta between its time and your expected time. (If you never send a time parameter, you're at the mercy of WiFi jitter.) Further messages will be millisecond accurate message-to-message, but with the fixed latency. You can adapt time per client if you want to account for speed-of-sound delay.
The time parameter is not meant to schedule things far in the future on the clients. If you send a new time that is outside 20,000ms from its expected delta, the clock base will re-compute. Your host should be the main "sequencer" and keep track of performance state and future events.
Latency is adjustable, if you are comfortable with your network you can set it lower, or if using a local (127.0.0.1) connection, or directly sending messages in code, you can set it to 0.
Enumerating synths
The sync command (see alles.sync()) triggers an immediate response back from each on-line synthesizer. The response looks like _s65201i4c248y2, where s is the time on the client, i is the index it is responding to, y has battery status (for versions that support that) and c is the client id. This lets you build a map of not only each booted synthesizer, but if you send many messages with different indexes, will also let you figure the round-trip latency for each one along with the reliability.
WiFi & reliability for performances
UDP multicast is naturally 'lossy' -- there is no guarantee that a message will be received by a synth. Depending on a lot of factors, but most especially your wireless router and the presence of other devices, that reliability can sometimes go as low as 70%. For performance purposes, I highly suggest using a dedicated wireless router instead of an existing WiFi network. You'll want to be able to turn off many "quality of service" features (these prioritize a randomly chosen synth and will make sync hard to work with), and you'll want to in the best case only have synthesizers as direct WiFi clients. An easy way to do this is to set up a dedicated wireless router but not wire any internet into it. Connect your laptop or host machine to the router over a wired connection (via a USB-ethernet adapter if you need one), but keep your laptop's wifi or other internet network active. In your controlling software, you simply set the source network address to send and receive multicast packets from. alles_util.py has setup code for this. This will keep your host machine on its normal network but allow you to control the synths from a second interface.
If you're in a place where you can't control your network, you can mitigate reliability by simply sending messages N times. Sending multiple duplicate messages (with the same time parameter) do not have any adverse effect on the synths.
Clients
Minimal Python example:
import socket
multicast_group = ('232.10.11.12', 9294)
sock = socket.socket(socket.AF_INET, socket.SOCK_DGRAM)

def send(oscillator=0, freq=0, vel=1):
    sock.sendto("v%df%fl%fZ" % (oscillator, freq, vel), multicast_group)

def c_major(octave=2):
    send(oscillator=0,freq=220.5*octave)
    send(oscillator=1,freq=138.5*octave)
    send(oscillator=2,freq=164.5*octave)
See alles.py for a better example. Any language that supports sockets and multicast can work, I encourage pull requests with new clients!
You can also easily use it in Max or Pd:
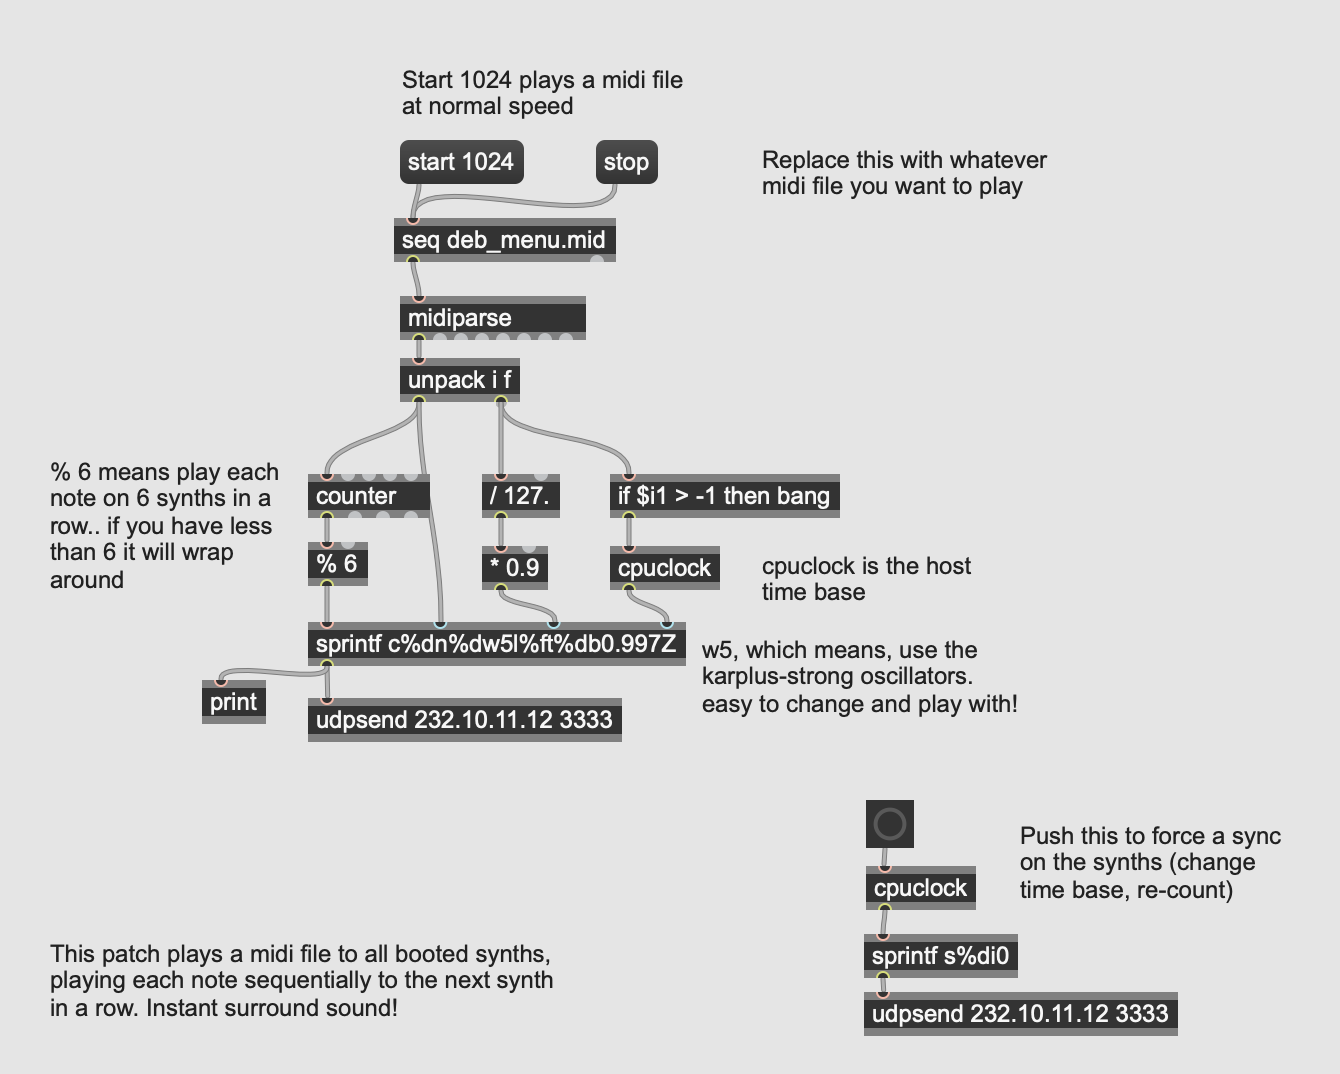
Photo credit
Synthesizer Details
See AMY's readme for more details on the synthesizer itself.
Get your own Alles!
Read here how to install a PCB into a speaker shell!
If you want the small circular speakers shown on this page and videos, they are easy to get. Here's a link to them on Alibaba: the round A60s – the square-shaped A70s also work! You then can buy an Alles PCB from us with no terminals for speaker and battery -- the connections for the shell solder directly to the board. It takes me about 3 minutes to assemble the Alles PCB inside the A60 or A70 speaker. To do it this way, you only need a wire stripper, a small screwdriver and a soldering iron.
IMPORTANT: Alles is sold on a "best effort" community support basis. We will send you working PCBs with the latest Alles firmware loaded on them. Anything that happens after that is up to the community to help with. Alles requires a little bit of computer and networking know-how to get going. We've made it as easy as possible, we hope, but we know we have more work to do before this is ready for a very wide audience. Please use GitHub issues for anything you're having trouble with and we'll do our best to help you figure it out.
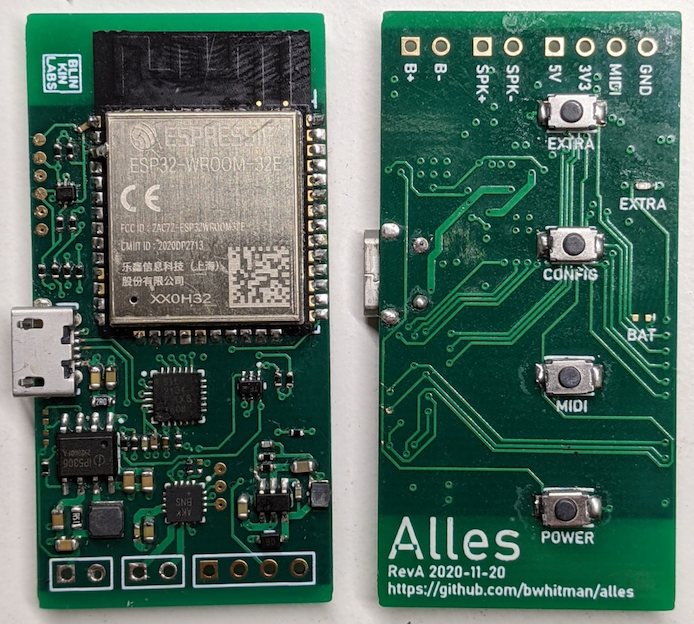
Photo credit
DIY Alles
It's very simple to make one yourself with parts you can get from electronics distributors like Sparkfun, Adafruit or Amazon.
To make an Alles synth yourself, you need
- ESP32 dev board (any one will do, but you want pins broken out) (pack of 2, $7.45 each). Try to get a 8MB flash on yours if you want to have over-the-air updating.
- The Adafruit I2S mono amplifier ($5.95)
- 4 ohm speaker, this one is especially nice ($9.77, but you can save a lot of money here going lower-end if you're ok with the sound quality). I also like speakers with prebuilt cases, like these bookshelf speakers.
- A breadboard, custom PCB, or just some hookup wire!
A 5V input (USB battery, USB input, rechargeable batteries direct to power input) powers both boards and speaker at pretty good volumes. A 3.7V LiPo battery will also work, but note the I2S amp will not get as loud (without distorting) if you give it 3.7V. If you want your DIY Alles to be portable, I recommend using a USB battery pack that does not do low current shutoff. The draw of the whole unit at loud volumes is around 90mA, and at idle 40mA.
Wire up your DIY Alles like this (I2S -> ESP)
LRC -> GPIO25
BCLK -> GPIO26
DIN -> GPIO27
GAIN -> I2S Vin (i jumper this on the I2S board)
SD -> not connected
GND -> GND
Vin -> Vin / USB / 3.3 (or direct to your 5V power source)
Speaker connectors -> speaker
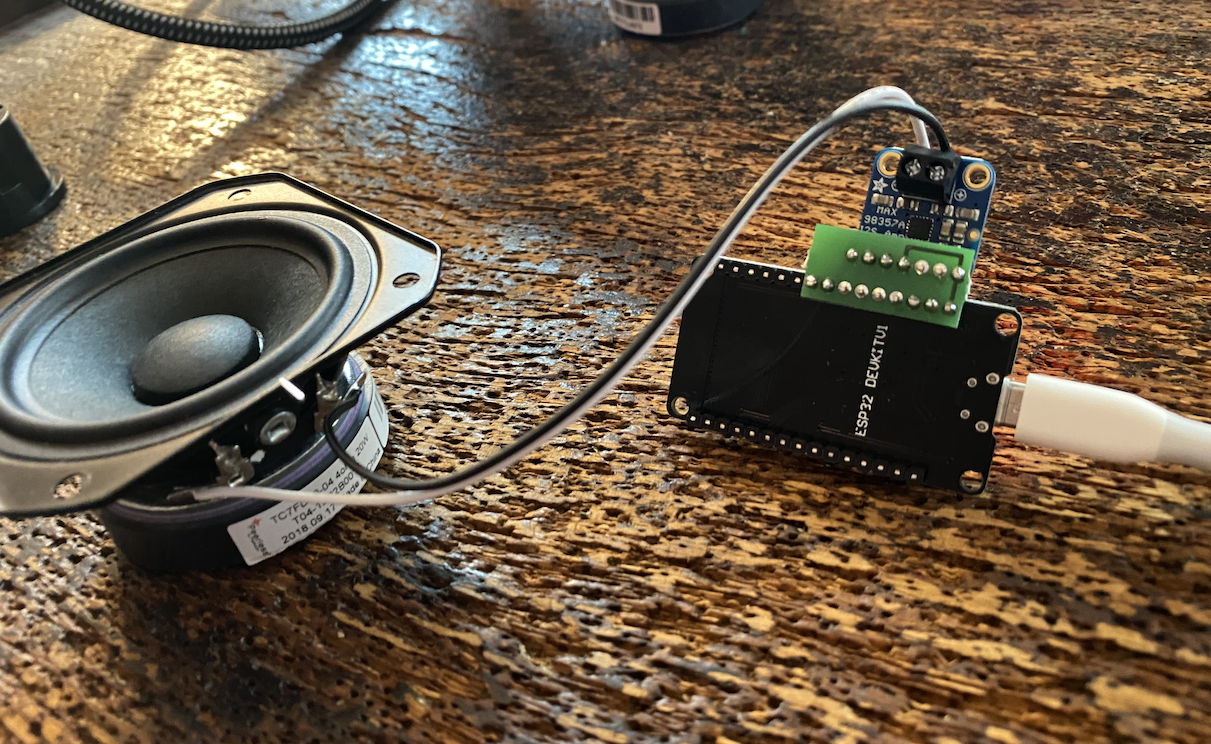
Photo credit
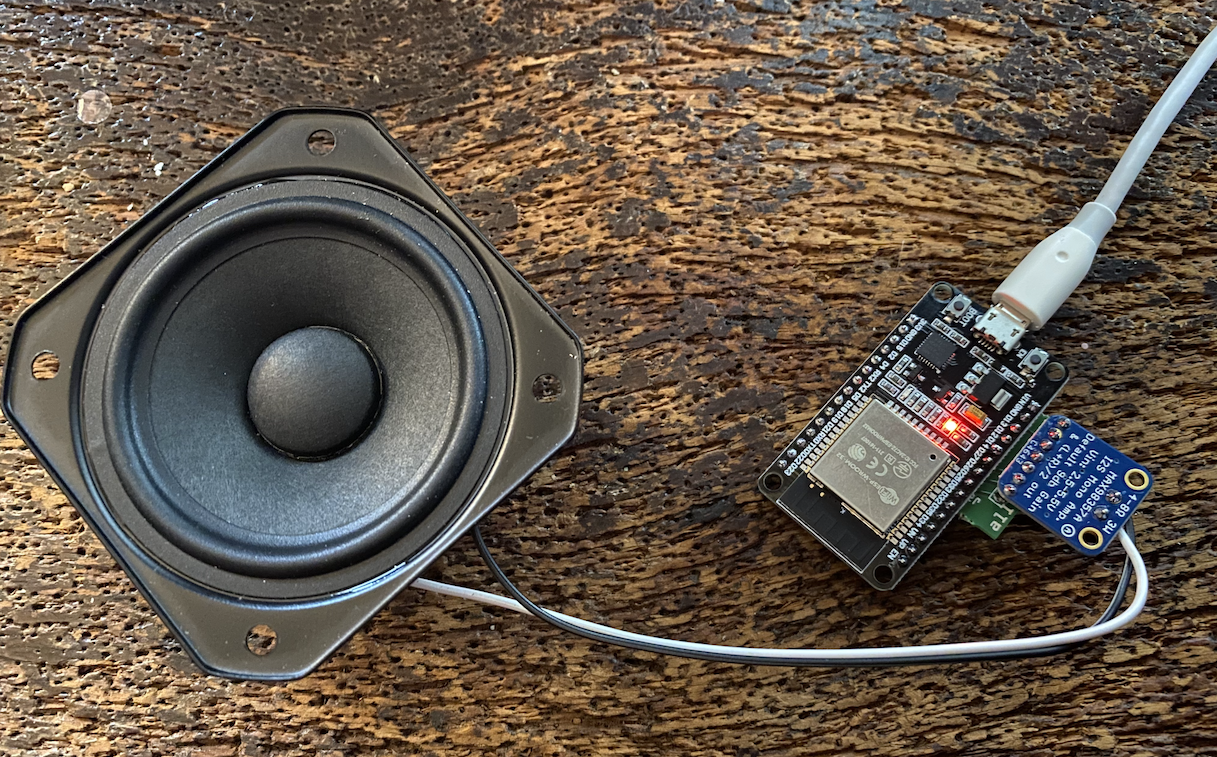
Photo credit
DIY bridge PCB
You don't need this PCB made to build a DIY Alles! -- it will work with just hookup wire. But if you're making a lot of DIY Alleses want more stability, I had a tiny little board made to join the boards together, like so:
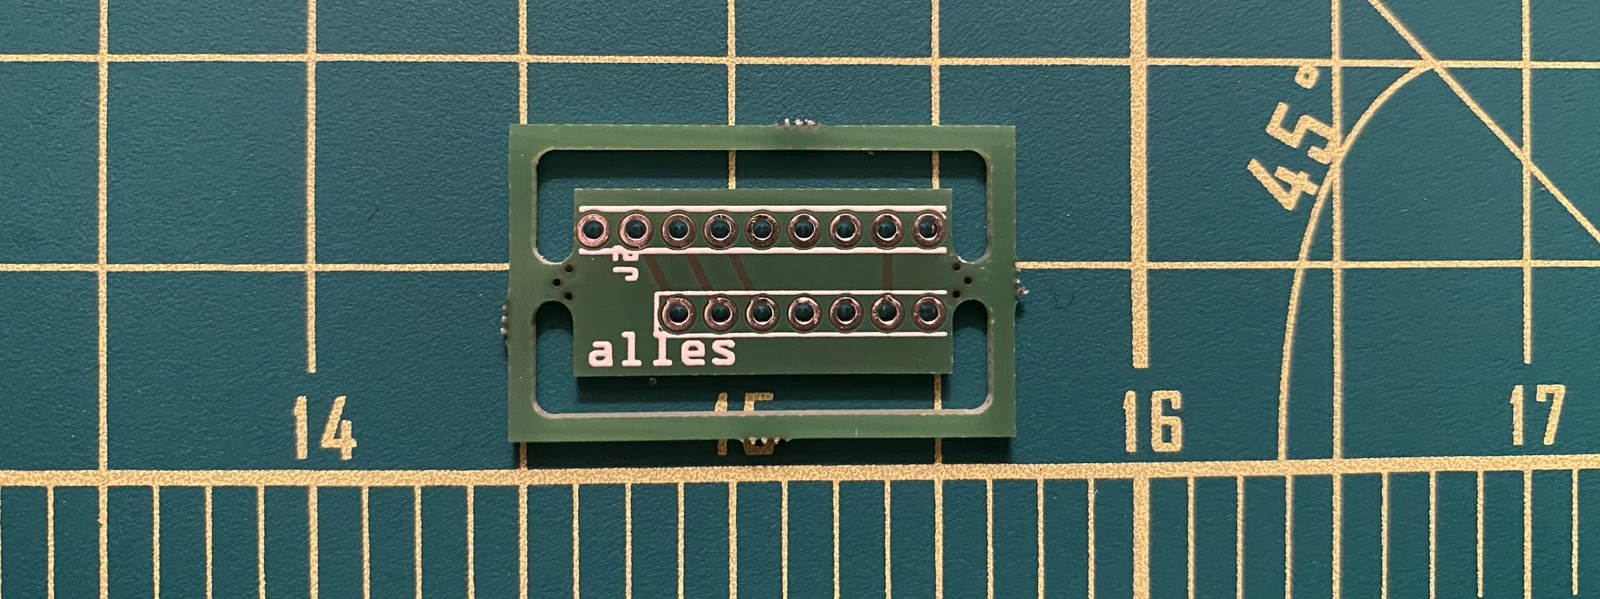
Photo credit
pics/adapter.jpg
Brian Whitman, Shore Pine and contributors · MITResized without cropping and converted to WebP.
This assumes you're using the suggested ESP32 dev board with its pin layout. If you use another one, you can probably change the GPIO assignments in alles.h. Fritzing file in the pcbs folder of this repository, and it's here on Aisler. This is a lot more stable and easier to wire up than snipping small bits of hookup wire, especially for the GAIN connection.
Disabling OTA for 4MB boards
If you are using your own dev board and it has less than 8MB of flash (4MB is common), first overwwrite alles_partitions.csv with the contents ofalles_4mb_partitions.csv as well as run idf.py menuconfig and change the flash size from 8MB to 4MB (in Serial Flasher Config) -- this will disable the OTA firmware upgrading, but will otherwise work fine. The binary for Alles is almost 4MB total and OTA needs space for two copies to be stored on the flash.
ESP32 Firmware
Alles is completely open source, and can be a fun platform to adapt beyond its current capabilities.
You can upgrade the firmware or write your own using the USB connection. See the guide on flashing a hardware Alles speaker (either DIY or one of ours).
THANK YOU TO
- Alles would not be possible without the help of DAn Ellis, who helped me with most of the oscillator stack, a lot of deep dives into our algorithm synth, and many great ideas / fixes on the ESP32 code.
- Douglas Repetto
- Raph Levien for his work on MSFA which gave us a lot of hints for our FM implementation
- mark fell
- esp32 WiFi Manager
- kyle mcdonald
- Matt Mets / Blinkinlabs
TODO
power buttonwifi setup should ask for default power saving / latency -- no for nowremove distortion at higher amplitudes for mixed sine wavesFMshould synths self-identify to each other? would make it easier to use in Maxsee what you can do about wide swings of UDP latency on the netgear routerenvelopes / note on/offs / LFOsconfirm UDP still works from Max/Pdbandlimit the square/saw/triangle oscillatorskarplus-strongwifi hotspot mode for in-field setupbroadcast UDP for multiplesdropped packetssync and enumerate across multiple devicesaddresses / communicate to one or groups, like "play this on half / one-quarter / all"do what i can about timing / jitter - sync time? timed messages?case / battery setupoverloading the volume (I think only on FM) crashesUDP message clicks- desktop USB flasher
- BT / app based config instead of captive portal (later)
Alles A60/A70 Speaker Assembly
The Alles PCB can be fitted into the enclosure of an off-the-shelf Bluetooth speaker - either the round A60 or the square A70. The Alles PCB replaces the original circuit board and keeps the speaker, battery, and buttons. Once installed, the USB port of the Alles PCB remains accessible and can be used to charge the battery. The speaker's buttons control the power, volume and WiFi mode (via the Play/Pause button). The result is a fully contained, battery-powered and rechargeable Alles speaker!
Suggested Tools
- A60/A70 Speaker (A60 used here)
- Alles PCB (Rev E used here)
- Soldering iron
- Flush cutters
- Fine flat-headed screwdriver, or a fine pointed tool that can fit in the speaker grill holes (0.8mm diameter screwdriver used here)
- Small Phillips screwdriver (shaft no wider than 3.5mm diameter, and at least 22mm long)
- Wire strippers
- Helping hands
- Solder fume extractor
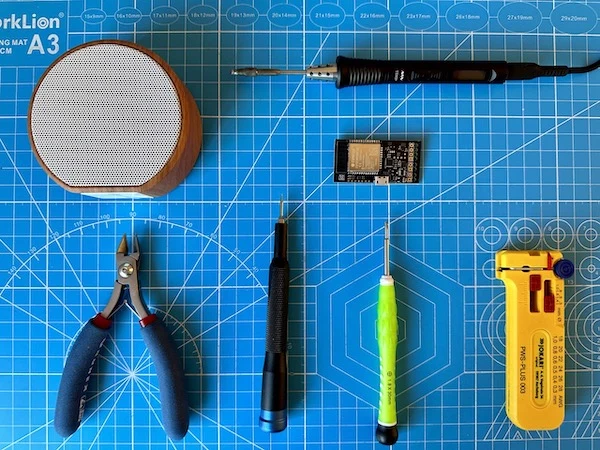
Photo credit
pics/speaker_assembly/1.jpeg
Brian Whitman, Shore Pine and contributors · MITResized without cropping and converted to WebP.
Remove speaker grill
The metal grill is held in place by friction only. Use the small pointed tool to gradually work the edges of the grill loose, away from the plastic enclosure. Work your way around the speaker lifting the perimeter gradually to avoid bending the mesh out of shape. Under the grille is a paper filter - set this aside too.
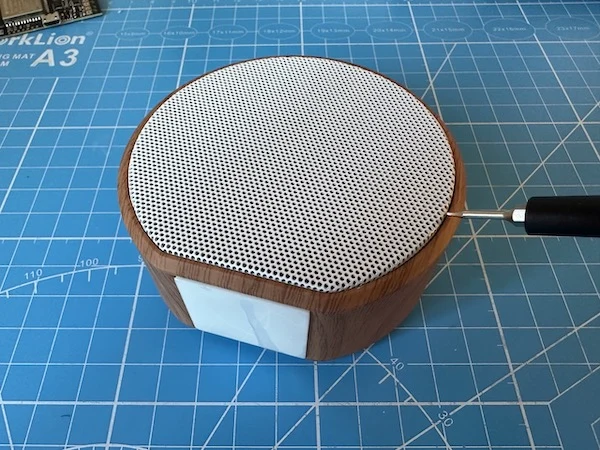
Photo credit
pics/speaker_assembly/2.jpeg
Brian Whitman, Shore Pine and contributors · MITResized without cropping and converted to WebP.
Unscrew enclosure
Use the small Phillips screwdriver to remove the 4 screws that hold the back and front of the enclosure together. The screws are set fairly deep inside narrow mounting holes, needing a thin (<3.5mm diameter) and long (>20mm) screwdriver. Screwdriver sets with interchangeable tips are unlikely to work.
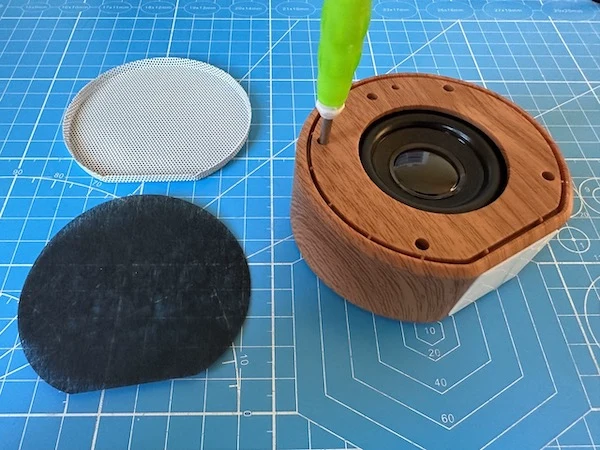
Photo credit
pics/speaker_assembly/3.jpeg
Brian Whitman, Shore Pine and contributors · MITResized without cropping and converted to WebP.
Remove circuit board
Lift out circuit board and cut it free of the speaker and battery cables. Cut the cables close to where they are soldered to the PCB.
CAUTION: LIPO BATTERIES ARE DANGEROUS
When cutting the battery cables, cut them one a time to avoid shorting them with the wire cutter. Always make sure that there is no chance that red and black terminals can short at any time as this could permanently damage the battery and could even result in the battery catching fire.
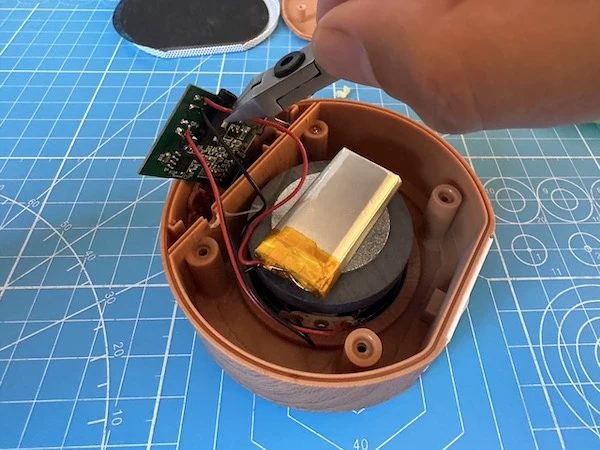
Photo credit
pics/speaker_assembly/4.jpeg
Brian Whitman, Shore Pine and contributors · MITResized without cropping and converted to WebP.
Cut plastic ribs
Use the flush cutters to trim the two ribs that supported the original PCB, which would interfere with the location of the ESP32 module in the Alles PCB.
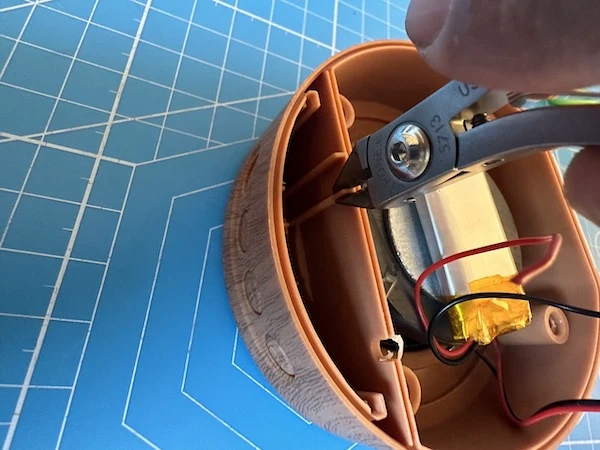
Photo credit
pics/speaker_assembly/5.jpeg
Brian Whitman, Shore Pine and contributors · MITResized without cropping and converted to WebP.
Trim and tin wires
Strip, trim and tin with solder the battery and speaker wires. Leave about 2mm of tinned conductor exposed. Again, use caution when working on the battery wires - do one at a time, and make sure the other is safely isolated during the process so that they never come into contact and short the battery terminals.
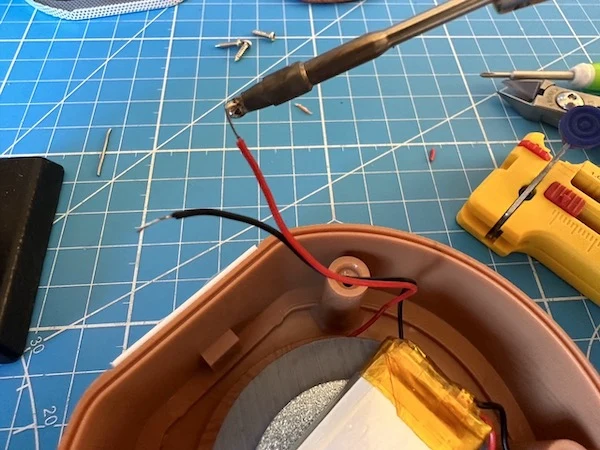
Photo credit
pics/speaker_assembly/6.jpeg
Brian Whitman, Shore Pine and contributors · MITResized without cropping and converted to WebP.
Solder wires onto Alles PCB
Solder all four wires from the component-side of the Alles PCB. Make sure that the wire insulator is flush against the PCB solder point so that wires can safefly twist without risk of shorting.
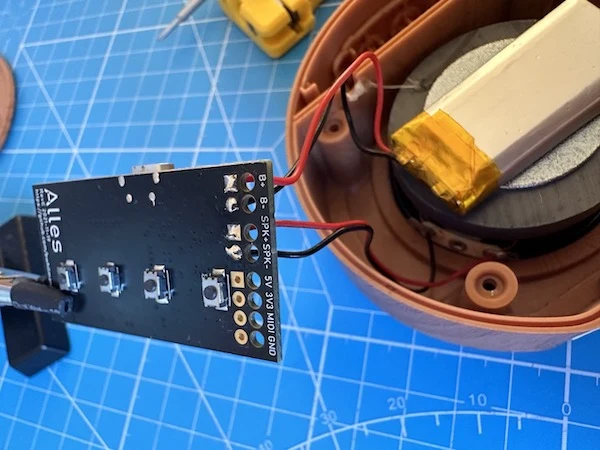
Photo credit
pics/speaker_assembly/7.jpeg
Brian Whitman, Shore Pine and contributors · MITResized without cropping and converted to WebP.
Fit the Alles PCB into the enclosure
The Alles PCB should slide between two rails that hold the circuit board in place. The ReV E PCB used here is 0.3mm thicker than the speaker's original circuit board so getting it into the rails can be a tight fit.
First, make sure that the plastic buttons are correctly in place by pushing their plungers from inside the enclosure. When the PCB is in place these plungers will contact the tact switches on the circuit board.
Align the PCB edges with the channels and firmly and gradually press the PCB into the grooves. Try to press down both sides simultaneous and avoid putting pressure on the USB connector.
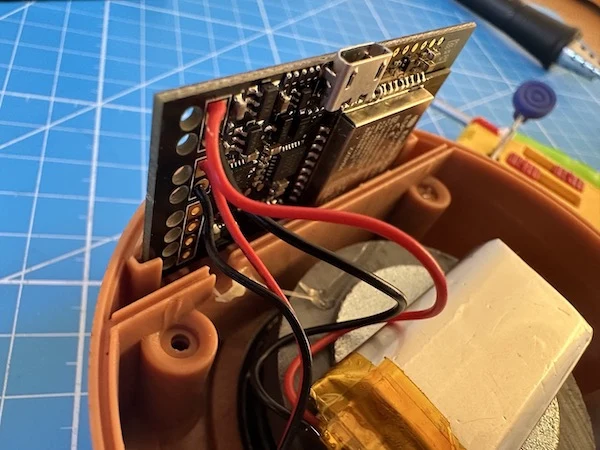
Photo credit
pics/speaker_assembly/8.jpeg
Brian Whitman, Shore Pine and contributors · MITResized without cropping and converted to WebP.
The PCB is fully in place when it is flush with the edge of the enclosure and the cables sit inside the slot.
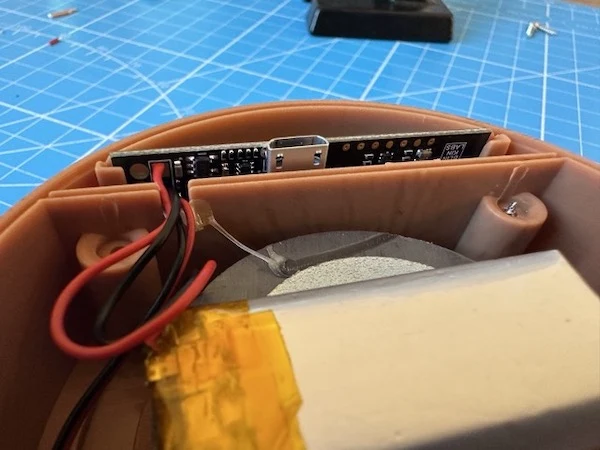
Photo credit
pics/speaker_assembly/9.jpeg
Brian Whitman, Shore Pine and contributors · MITResized without cropping and converted to WebP.
Test fit and aligment
Test the fit and aligment by putting the back cover in place. The edges should sit flush with the edge of the enclosure, and the USB connector should be aligned with the opening on the cover.
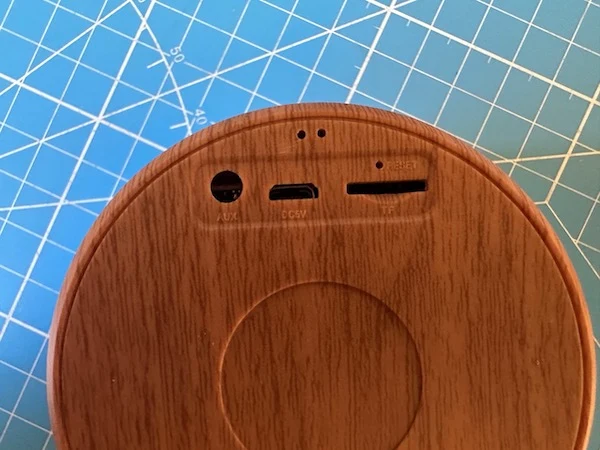
Photo credit
pics/speaker_assembly/10.jpeg
Brian Whitman, Shore Pine and contributors · MITResized without cropping and converted to WebP.
Reassemble the speaker
Screw the enclosure together, replace the paper filter, and press the metal grill back into place.
Photo credit
pics/speaker_assembly/11.jpeg
Brian Whitman, Shore Pine and contributors · MITResized without cropping and converted to WebP.
Alles Flashing HOWTO
This page will help you upgrade your own firmware on an Alles hardware speaker.
Upgrading firmware wirelessly / OTA
If you have a recent model (you received it after November 2021), or flashed your firmware after November 2021, you can upgrade your firmware over the internet wirelessly, called OTA, "over-the-air."
After you first set up wifi (and make sure your speaker is on a wifi network that can connect to the internet,) if you turn off, then on the speaker, then press the + button while the "joining wifi" tones are playing (in the few seconds before it plays the turn-on bleep), the speaker will connect to the internet and download the latest released Alles speaker firmware right to the device, then reboot. It takes about a minute, and you'll hear a different (sometimes glitchy sounding -- that's ok --) repeating tone while it works.
Upgrading firmware over USB
If you want to write your own Alles firmware, or have a speaker before December 2021 and need to get it to support wireless upgrading, follow these directions:
The back of the hardware speaker has a micro-USB plug you use for charging. It also can be used to upgrade the firmware. Once you upgrade an Alles speaker to a recent version, you can use the wireless / OTA flashing method going forward.
To do this, you need to set up the following things:
Set up ESP-IDF
ESP-IDF is the set of open source tools and libraries that work on the CPU powering Alles, the ESP32. You should first install ESP-IDF on your system if you haven't already.
Download the supported version of ESP-IDF. That is currently 5.2. You can download it directly here. Unpack it to a folder. I like to keep them in ~/esp/, as you'll likely want to use different versions eventually. So we'll assume it's in ~/esp/esp-idf-v5.2.
# install ESP-IDF that comes with our repository
~/esp/esp-idf-v5.2/install.sh esp32
source ~/esp/esp-idf-v5.2/export.sh
If you have trouble, for more info, or for other platforms, you should follow the detailed instructions to download and set up esp-idf.
Get the UART drivers
If using macOS, you'll want to also install the CP210X drivers if you haven't already.
Get the Alles repository
You likely already have this, but if not, clone this repository.
Get a real micro-USB cable
The cable you may have received from us for the hardware speaker is charge only. Find a longer micro-USB cable that transmits data and connect it to the computer and speaker.
Flash
Then, in the esp folder you created during installing the ESP-IDF above (e.g. cd ~/esp), run . ./esp-idf-v5.2/export.sh. Now, in the same terminal window (export.sh sets some environment variables), cd back into the alles repository folder you downloaded and run idf.py flash to build and flash to the board. It will take a couple of minutes and show you progress. The board will reboot into the latest firmware.
(If the flashing process doesn't work, it's likely not finding your UART location. Type ls /dev/*usb* to find something like /dev/tty.usbserial.XXXXX or /dev/cu.usbserialXXXX. You'll want to find the tty that appears when you connect the speaker to computer. Copy this location and try flashing again with idf.py -p /dev/YOUR_SERIAL_TTY flash.)
Monitor
If you want to see debugging messages, use idf.py -p /dev/YOUR_SERIAL_TTY monitor to reboot the board and see stdout/stderr. Use Ctrl-] to exit the monitor.
Alles Speaker RevB getting started notes
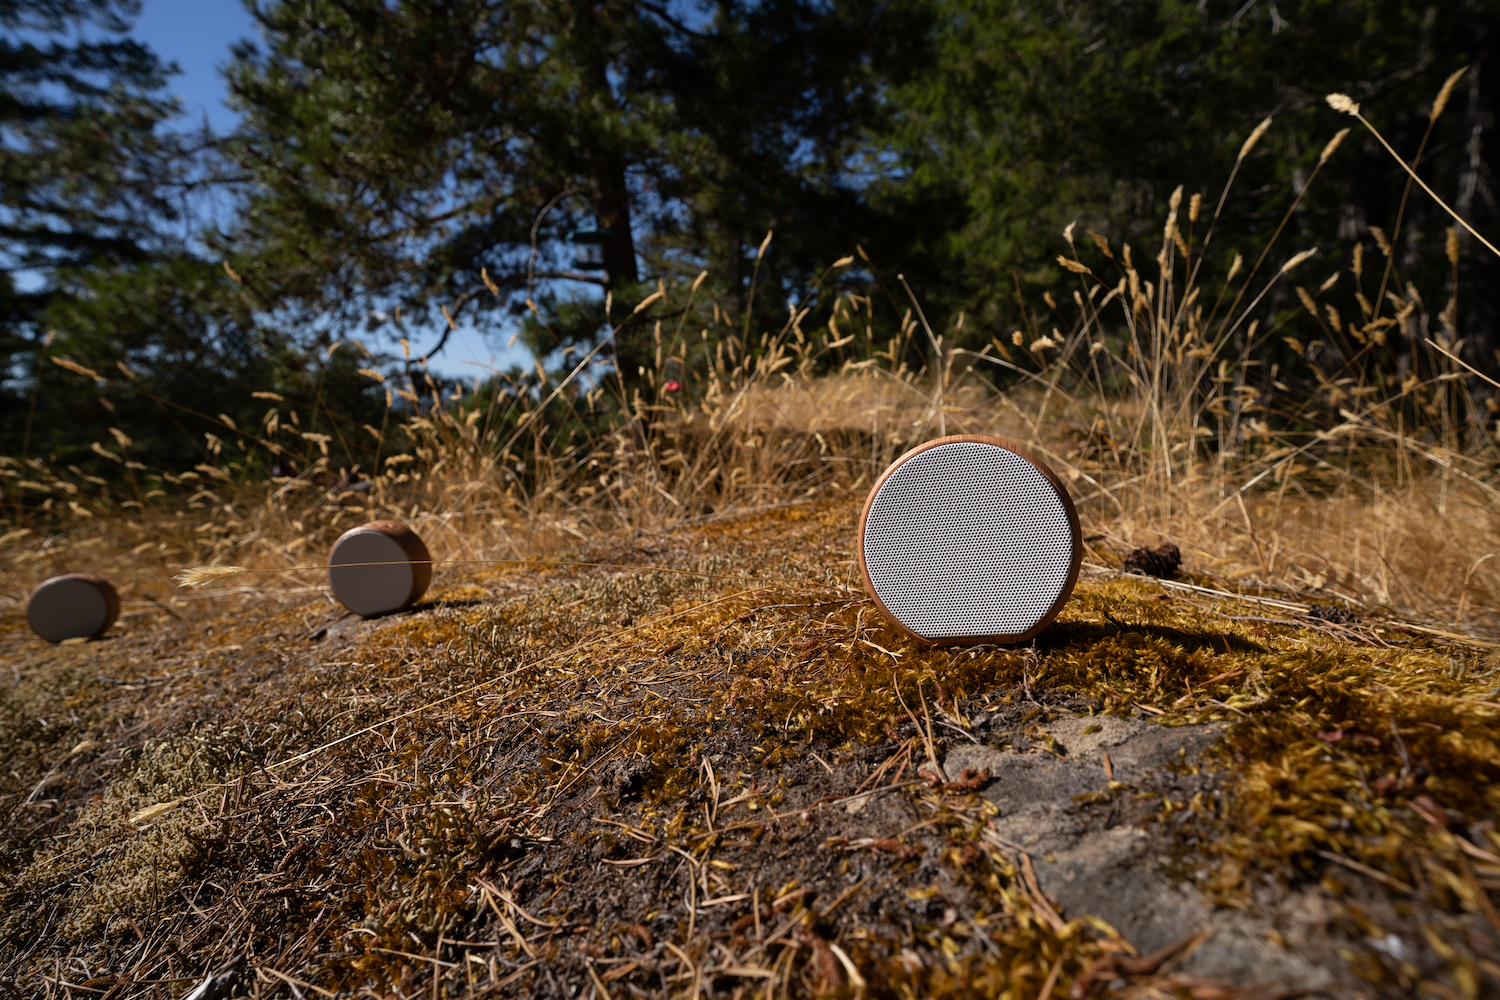
Photo credit
Hello! You're the lucky owner of at least one Alles speaker. This guide will help you get started.
The Speaker
Wait, I don't have a speaker yet
That's ok! You can run a software speaker too. Skip down to the section Setup and then do Alles on your computer to run a software version of the speaker. You can then keep following this guide no problem.
Back to the hardware speaker
Read here on how to get your Alles PCB into a speaker shell!
Each Alles speaker has four buttons up top and a USB micro receptacle on back.
Before getting going, let's make sure the speaker is charged or charging. Simply plug the included USB cable between the speaker and any USB charge point, like a phone charger. (If you hook it into a computer, the speaker will show up as a USB device for debugging and upgrades, but you don't have to worry about that for now -- all control happens wirelessly.) The battery will last "a few hours" making constant music and longer with sparse or silence. It shouldn't take more than an hour or so to charge. If the power button does not make any noise, it's probably a dead battery.
The row of buttons up top, facing the speaker, are power, volume + and -, and WiFi setup (the play/pause). Volume can be set with those buttons or using alles.volume() from your compositions. Using alles.volume() will override whatever you set with the buttons.
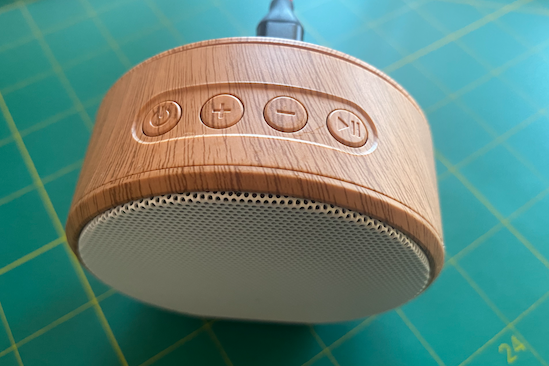
Photo credit
The power button turns the speaker off and on. When you turn it on, it will re-join the network and mesh.
The WiFi button will forget the WiFi details, if any were stored, and put the device into WiFi setup mode. This is the default if no WiFi has yet been set.
Join a WiFi network
If this is your first time using the speaker, you'll need to tell it which WiFi network to join. You can easily change this later, but once you set it, you don't need to set it again.
Press the power button. You'll start to hear a "chime noise" repeating. This is the "searching for WiFi" sound, and will play until it finds a WiFi point, or the power button is hit again, or if two minutes goes by, at which point it'll shut off again.
If you've already set a WiFi network, after about a few seconds the chime noise will end and you'll hear a "bleep" tone and then silence. That means the WiFi network has been joined and everything is ready to go.
If you haven't set WiFi yet, now open your nearest mobile phone or any WiFi device with a browser. Go to join a new WiFi network on your device and you'll see a network listed called alles-synth-XXXXXX where XXXXXX is a unique string per speaker (useful when you have many speakers!). Join that network. On most devices (iPhones, Androids especially) after a few seconds, a browser window will appear with a login page. This is like when you join a hotel's network or other captive portal. If the page never appears, try going to http://10.10.0.1 in your browser after joiining the network.
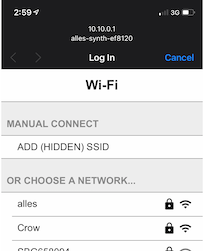
Photo credit
Wait a few seconds for the login page to populate with all the nearby WiFi stations it finds. After you see the one you want the speaker to join, tap it and carefully enter its password. This should be the same network as the computer you're going to control Alles from. After a few moments, the speaker should stop chiming, indicating it has succesfully joined the network and saved the details to its internal storage.
If this doesn't seem to work, try again by hitting the WiFi button (play/pause) and the process will repeat again.
Upgrade the firmware
It's helpful to make sure your Alles speaker has the latest firmware. If you have a recent speaker, you can do this wirelesly. If you have an older one, it's slightly more complicated but only takes a few minutes of setup (and you can do it wirelessly going forward.) See the guide on upgrading a hardware Alles speaker
Control Alles
You send the mesh (group of speakers) explicit messages that define the state of oscillators. You can control anything you can imagine, with high precision and millisecond accuracy. You can control up to 64 oscillators on each of any number of speakers in a mesh. You do this from either a programming language like Python (what we use) or an environment like Max/MSP (or Max for Ableton Live). Python is built-in on Macs and pretty easy to use once you get the hang of it. And then you can write small programs to make interesting sounds! For this tutorial, we'll use Python. But there's also a Max patch you can download that shows you how to access all the same parameters as we're changing in Python. So it's up to you!
So let's start python. Open your terminal, on a Mac, that's Terminal.app, on Windows I suggest using WSL, and on Linux whatever you've installed. Clone this repository if you haven't already. (git clone https://github.com/shorepine/alles.git) Also make sure to update the submodules, so cd alles; git submodule update --init --recursive. Make sure you are in the directory containing the repository. And type python3. If on Mac, if you've never done this sort of thing before, you may have to accept a small download of tools from Apple the first time you run Python. Let that finish. Then you'll see a prompt like >>>.
Start by importing the Python module needed to control the mesh: import alles
Simple examples
alles.drums() should play a test pattern out of all the currently turned-on speakers. They should all be in sync and playing the same thing.
Try to set the volume of the speaker with alles.volume(2) -- that can be up to 10 or so. The default is 1. You can also use the + and - buttons on the speaker, but anything you set with alles.volume() will override the buttons.
When you want the speakers to be quiet, or if things are acting funny, use alles.reset(). That resets all speakers to defaults. Sometimes lots of experiments will get your oscillators in a weird state and alles.reset() is your escape hatch. You can also do alles.reset(osc=5) to do just one oscillator for example.
Let's set a simple sine wave first
alles.send(osc=0, wave=alles.SINE, freq=220, amp=1)
What we're doing here should be pretty straightforward. I'm telling oscillator 0 to be a sine wave at 220Hz and amplitude 1. You can also try alles.PULSE, or alles.SAW_DOWN, etc.
Why can't you hear anything yet? It's because you haven't triggered the note on for this oscillator. We accept a parameter called vel (velocity) that can turn a note on or off (vel=0.) So now that we've set up the oscillator, we just turn it on by alles.send(osc=0, vel=1). Note the oscillator remembers all its state and setup. To turn off the note, just do alles.send(osc=0, vel=0).
You can also make oscillators louder with amp or vel over 1.
Make sure to try alles.reset() to stop everything too.
You can also always use note, (MIDI note value) instead of freq.
alles.send(osc=0, wave=alles.SINE, note=57, vel=1)
Now let's make a lot of sine waves!
import time
alles.reset()
for i in range(16):
    alles.send(osc=i, wave=alles.SINE, freq=110+(i*80), vel=((16-i)/32.0))
    time.sleep(0.5) # Sleep for 0.5 seconds
Neat! You can see how simple / powerful it is to have control over lots of oscillators. You have up to 64. Let's make it more interesting. A classic analog tone is the filtered saw wave. Let's make one.
alles.send(osc=0,wave=alles.SAW_DOWN,filter_freq=2500, resonance=5, filter_type=alles.FILTER_LPF)
alles.send(osc=0, vel=1, note=40)
Sounds nice. But we want that filter freq to go down over time, to make that classic filter sweep tone. Let's use a breakpoint! A breakpoint is a simple list of (time, value) - you can have up to 8 of those pairs, and up to 3 different sets to control different things. They're just like ADSRs, but more powerful. You can control amplitude, frequency, duty cycle, feedback, filter frequence, or resonance with a breakpoint. It gets triggered when the note does. So let's make a breakpoint that turns the filter frequency down from its start at 2500 to 1250 after 100 milliseconds. And when the note goes off, taper the frequency to 0 after 25 millseconds.
alles.send(osc=0,wave=alles.SAW_DOWN,filter_freq=2500, resonance=5, filter_type=alles.FILTER_LPF)
alles.send(osc=0, bp0="100,0.5,25,0", bp0_target=alles.TARGET_FILTER_FREQ)
alles.send(osc=0, vel=1, note=40)
Great. You can add multiple targets together, for example, if you want a breakpoint to control both filter frequency and resonance, use bp0_target=alles.TARGET_FILTER_FREQ+alles.TARGET_RESONANCE. Give it a go!
We also have LFOs, which are implemented as one oscillator modulating another. You set the lower-frequency oscillator up, then have it control a parameter of another audible oscillator. Let's make the classic 8-bit duty cycle pulse wave modulation, a favorite:
alles.send(osc=1, wave=alles.SAW_DOWN, freq=0.5, amp=0.75)
alles.send(osc=0, wave=alles.PULSE, duty=0.5, freq=220, mod_source=1, mod_target=alles.TARGET_DUTY)
alles.send(osc=0, vel=0.5)
You see we first set up the modulation oscillator (a saw wave at 0.5Hz, with amplitude 0.75-- this indicates the "depth" of the LFO). Then we set up the oscillator to be modulated, a pulse wave with mod source of oscillator 1 and mod target of duty cycle. The initial duty cycle will start at 0.5 and be multiplied by the state of oscillator 1 every tick, to make that classic thick saw line from the C64 et al. The modulation will re-trigger every note on. Just like breakpoints, you can modulate duty cycle, amplitude, frequency, filter frequency, resonance or feedback! And if you want to modulate more than one thing, like frequency and duty, just add them together:
alles.send(osc=1, wave=alles.TRIANGLE, freq=5, amp=0.25)
alles.send(osc=0, wave=alles.PULSE, duty=0.5, freq=110, mod_source=1, mod_target=alles.TARGET_DUTY+alles.TARGET_FREQ)
alles.send(osc=0, vel=0.5)
There's a lot more parameters and things to play with. Check out the Alles README for the full list, or look at alles.message in Python:
# alles.message():
(osc=0, wave=-1, patch=-1, note=-1, vel=-1, amp=-1, freq=-1, duty=-1, feedback=-1, timestamp=None, reset=-1, phase=-1, \
        client=-1, retries=1, volume=-1, filter_freq = -1, resonance = -1, bp0="", bp1="", bp2="", bp0_target=-1, bp1_target=-1, bp2_target=-1, mod_target=-1, \
        debug=-1, mod_source=-1, eq_l = -1, eq_m = -1, eq_h = -1, filter_type= -1, algorithm=-1, ratio = -1, algo_source=None)
alles.py has some helpful presets, if you want to use them, or add to them. To make that filter bass, just do alles.preset(1, osc=0) and then alles.send(osc=0, vel=1, note=40) to hear it. Here's another one:
alles.preset(0, osc=2) # will set a simple sine wave tone on oscillator 2
alles.send(osc=2, note=50, vel=1.5) # will play the note at velocity 1.5
alles.send(osc=2, vel=0) # will send a "note off" -- you'll hear the note release
alles.send(osc=2, freq=220.5, vel=1.5) # same but specifying the frequency
alles.reset()
Multiple speakers
Do you have multiple Alleses? I hope so, that's where all the real fun is. Whether they are physical hardware speakers or the Alles desktop program running on your computer, all the speakers on the same network are able to be controlled in one big mesh. They learn about how many they are, know how to stay in sync, and get a number we call client associated with them after a few seconds of being on. Generally the first speaker you turn on will have a client of 0, and the next 1, and so on. If you turn off a speaker, the rest will eventually fill in that gap and re-order themselves.
When you are sending messages to Alles, if you don't specify client, all speakers receive the same message and play them at the exact same time. But it's more interesting to have different speakers play different types of sounds in sync. That example above, where we played 16 sine waves, is a good example. Let's adapt that to play a different sine wave on each speaker.
A quick way to know how many speakers are currently live in the mesh is to run alles.sync(). After a few seconds, you'll see a list spit out like
{0: {'reliability': 1.0, 'avg_rtt': 124.0, 'ipv4': 1, 'battery': ('charged', 4)},
 2: {'reliability': 1.0, 'avg_rtt': 67.3, 'ipv4': 5, 'battery': ('charged', 4)},
 1: {'reliability': 1.0, 'avg_rtt': 293.5, 'ipv4': 3, 'battery': ('charged', 4)}}
This shows you the battery status and other timing details of each one. You can use len(alles.sync()) to get a quick count for your compositions. Like so:
import time
alles.reset()
speakers = len(alles.sync())
for i in range(16):
    alles.send(osc=i, wave=alles.SINE, freq=110+(i*80), vel=((16-i)/32.0), client=i % speakers)
    time.sleep(0.5) # Sleep for 0.5 seconds
I've added the client parameter to the message, and asked it to play each sine wave on client ID i (0-16) mod (remainder / %) speakers, which for me is 3. That just means sine wave 0 is played on speaker 0, sine wave 1 on speaker 1, wave 2 on 2, wave 3 on 0 again, wave 4 on 1, and so on in a round robin. Try it out!
There's some other helpful tricks in client. If you give client a number greater than 255, you can address groups of speakers. This is helfpul if you have a lot, and you want to send a message to half of the speakers, or every third speaker. 257 will be every 2nd speaker, 258 every third speaker, and so on.
Additive synthesis
Those deep into synth lore already know why Alles is called that: we initially built it to be a multi-channel version of the "Alles Machine", a Bell Labs synth from the 70s/80s invented by Hal Alles. It was built as a bank of oscillators and envelopes with filters, just like ours. Except we can program oscillators to go anywhere in space and have a lot more of them.
Additive synthesis is simply adding together oscillators to make more complex tones. You can modulate the breakpoints of these oscillators over time, for example, changing their pitch or time without artifacts, as the synthesis is simply playing sine waves back at certain amplitudes and frequencies (and phases.) It's well suited to certain types of instruments.
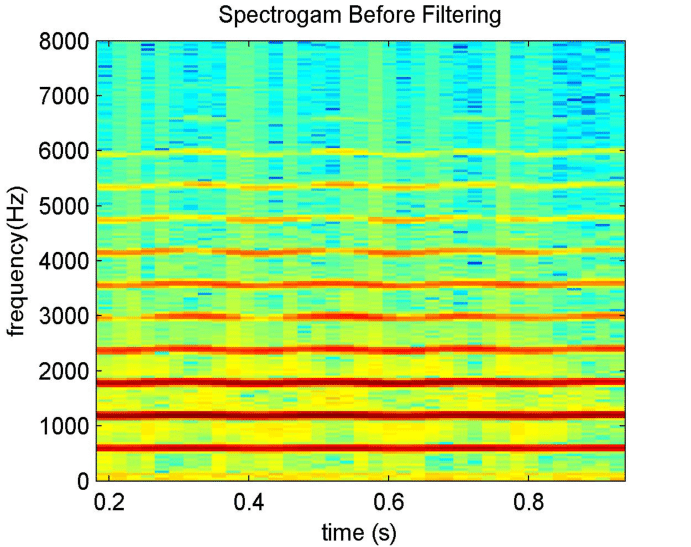
Photo credit
We have analyzed the partials of a group of instruments and stored them as presets baked into the speaker. Each of these patches are comprised of multiple sine wave oscillators, changing over time. The PARTIALS type has the presets:
alles.send(osc=0,vel=1,note=50,wave=alles.PARTIALS,patch=5) # a nice organ tone
alles.send(osc=0,vel=1,note=55,wave=alles.PARTIALS,patch=5) # change the frequency
alles.send(osc=0,vel=1,note=50,wave=alles.PARTIALS,patch=6,ratio=0.2) # ratio slows down the partial playback
There are 17 presets stored in each speaker, so patch can be between 0 and 16.
Our partial breakpoint analyzer also emits "noise-excited bandwidth enhancement", which means it tries to emulate tones that are hard to generate with sine waves alone by modulating the amplitude of a sine wave with a filtered noise signal. You can try that out on the patches by adding feedback, like so:
alles.send(osc=0,vel=1,note=50,wave=alles.PARTIALS,patch=6,feedback=0) # no bandwidth
alles.send(osc=0,vel=1,note=50,wave=alles.PARTIALS,patch=6,feedback=0.5) # more bandwidth
Below, in the advanced section, you'll learn how to analyze your own audio and play partials back from your host, to multiple speakers. Endless possibilities!
Fun with frequency modulation
As well as doing partial additive synthesis, Alles is also great at doing frequency modulation of sine waves. We call it ALGO. This is a type of synthesis you've heard quite a bit of, and is fun to play with. You can experiment most easily by trying one of the 201 presets we've baked into Alles. Give it a go like
alles.send(wave=alles.ALGO,osc=0,patch=0,note=50,vel=1)
alles.send(wave=alles.ALGO,osc=0,patch=1,note=50,vel=1)
The patch lets you set which preset. It can be from 0 to 200. Another fun parameter is ratio, which for ALGO patch types indicates how slow / fast to play the patch's envelopes. Really cool to slow them down!
alles.send(wave=alles.ALGO,osc=0,note=40,vel=1,ratio=0.5,patch=8) # half speed
alles.send(wave=alles.ALGO,osc=0,note=40,vel=1,ratio=0.05,patch=8)  # reaaall sloooow
alles.send(wave=alles.ALGO,osc=0,note=30,vel=1,ratio=0.1,patch=19) # love this one
Let's make the classic FM bell tone ourselves, without a preset. We'll just be using two operators (two sine waves), one modulating the other.
alles.reset()
alles.send(wave=alles.SINE,ratio=0.2,amp=0.1,osc=0,bp0_target=alles.TARGET_AMP,bp0="1000,0,0,0")
alles.send(wave=alles.SINE,ratio=1,amp=1,osc=1)
alles.send(wave=alles.ALGO,algorithm=0,algo_source="-1,-1,-1,-1,1,0",osc=2)
Let's unpack that last line: we're setting up a ALGO "oscillator" that controls up to 6 other oscillators. We only need two, so we set the algo_source to mostly -1s (not used) and have oscillator 1 modulate oscillator 0. You can have the operators work with each other in all sorts of crazy ways. For this simple example, we just use the DX7 algorithm #1 (but we count from 0, so it's algorithm 0). And we'll use only operators 2 and 1. Therefore our algo_source lists the oscillators involved, counting backwards from 6. We're saying only have operators 2 and 1, and have oscillator 1 modulate oscillator 0.
What's going on with ratio? And amp? Ratio, for FM synthesis operators, means the ratio of the frequency for that operator and the base note. So oscillator 0 will be played a 20% of the base note, and oscillator 1 will be the frequency of the base note. And for amp, that's something called "beta" in FM synthesis, which describes the strength of the modulation. Note we are having beta go down over 1,000 milliseconds using a breakpoint. That's key to the "bell ringing out" effect.
Ok, we've set up the oscillators. Now, let's hear it!
alles.send(osc=2, note=60, vel=3)
You should hear a bell-like tone. Nice. Another classic two operator tone is to instead modulate the higher tone with the lower one, to make a filter sweep. Let's do it over 5 seconds.
alles.reset()
alles.send(osc=0,ratio=0.2,amp=0.5,bp0_target=alles.TARGET_AMP,bp0="0,0,5000,1,0,0")
alles.send(osc=1,ratio=1)
alles.send(osc=2,algorithm=0,wave=alles.ALGO,algo_source="-1,-1,-1,-1,0,1")
Just a refresher on breakpoints; here we are saying to set the beta parameter (amplitude of the modulating tone) to 0.5 but have it start at 0 at time 0, then be at 1.0x of 0.5 (so, 0.5) at time 5000ms. At the release of the note, set beta immediately to 0. We can play it with
alles.send(osc=2,vel=2,note=50)
Nice. You can see there's limitless ways to make interesting evolving noises.
Karplus-Strong
Karplus-strong (KS) is a simple technique for synthesizing string instruments. You can play one at a time per speaker. You just need to remember to set the feedback parameter to something useful.
alles.reset()
alles.send(osc=0,wave=alles.KS,note=60,vel=1,feedback=0.996)
PCM Samples
Alles comes with a set of 67 drum-like and instrument PCM samples to use as well, as they are normally hard to render with additive or FM synthesis. You can use the type PCM and patch numbers 0-66 to explore them. Their native pitch is used if you don't give a frequency or note parameter, but you can change that.
alles.send(osc=0, wave=alles.PCM, vel=1, patch=10) # cowbell
alles.send(osc=0, wave=alles.PCM, vel=1, patch=10, note=70) # higher cowbell!
You can turn on sample looping, helpful for instruments, using feedback:
alles.send(wave=alles.PCM,vel=1,patch=21,feedback=0) # clean guitar string, no looping
alles.send(wave=alles.PCM,vel=1,patch=21,feedback=1) # loops forever until note off
alles.send(vel=0) # note off
alles.send(wave=alles.PCM,vel=1,patch=35,feedback=1) # nice violin
What's next
Make sure you read the main Alles README for more details!!
Advanced section
There's some real neat tricks Alles can do if you are adventurous. They require some computer setup, but it's not that complicated. We've tested this on recent Mac computers and Linux. Once you've completed the setup, you can build your own software Alles speaker and also generate your own partials from any audio and play them acros the mesh. Very fun!
Setup
If you've never done this sort of thing before, I recommend first installing Homebrew on your computer. It's safe and quick to get some necessary dev tools set up. Check if you have it already by typing brew in the Terminal. If not, copy and paste this line:
/bin/bash -c "$(curl -fsSL https://raw.githubusercontent.com/Homebrew/install/HEAD/install.sh)"
After that, make sure you're in the root of the Alles repository (like cd Downloads/alles-main/) and install the things you need. (If you've done this stuff before, you need Python 3, swig and ffmpeg, and the Python modules pydub and numpy.)
brew install python3 swig ffmpeg
python3.9 -m pip install pydub numpy --user
tar xvf loris-1.8.tar
cd loris-1.8
CPPFLAGS=`python3-config --includes` PYTHON=`which python3.9` ./configure --with-python
make
sudo make install
cd ..
Make your own partial playback synthesizer
As part of that setup you installed Loris, which is one of the better sine wave decomposition tools. (There's some others, if you get into this I recommend the great simpl project to A/B test Loris against MQ or SMS.) Loris analyzes PCM audio into sets of partials (think of it as a sine wave over time in a spectrogram), each with a series of breakpoints, each specifying time, frequency, amplitude, bandwidth and phase. The PARTIALS presets you played with above are based on Loris analysis of instrument samples. But you can make your own analyses and control Alles using them.
import partials
(m,s) = partials.sequence("sleepwalk.mp3")
109 partials and 1029 breakpoints, max oscs used at once was 8

partials.play(s, amp_ratio=2, bw_ratio=0)
https://user-images.githubusercontent.com/76612/131150119-6fa69e3c-3244-476b-a209-1bd5760bc979.mp4
You can see, given any audio file, you can hear a sine wave decomposition version of it across Alles. This particular sound emitted 109 partials, with a total of 1029 breakpoints among them to play back to the mesh. Of those 109 partials, only 8 are active at once. partials.sequence() performs voice stealing to ensure we use as few oscillators as necessary to play back a set.
There's a lot of parameters you can (and should!) play with in Loris. partials.sequence and partials.playtakes the following with their defaults:
def sequence(filename, # any audio filename
                max_len_s = 10, # analyze first N seconds
                amp_floor=-30, # only accept partials at this amplitude in dB, lower #s == more partials
                hop_time=0.04, # time between analysis windows, impacts distance between breakpoints
                max_oscs=alles.OSCS, # max Alles oscs to take up, can be > 64 if using multiple speakers
                freq_res = 10, # freq resolution of analyzer, higher # -- less partials & breakpoints
                freq_drift=20, # max difference in Hz within a single partial
                analysis_window = 100 # analysis window size
                ) # returns (metadata, sequence)

def play(sequence, # from partials.sequence
                osc_offset=0, # start at this oscillator #
                sustain_ms = -1, # if the instrument should sustain, here's where (in ms)
                sustain_len_ms = 0, # how long to sustain for
                time_ratio = 1, # playback speed -- 0.5 , half speed
                pitch_ratio = 1, # frequency scale, 0.5 , half freq
                amp_ratio = 1, # amplitude scale,
                bw_ratio = 1, # bandwidth / noise scale
                round_robin=True # play back one partial per speaker in a round robin
                )
Hopefully you can experiment with this setup and make some great music.
Alles on your computer
The speakers are great for live performance and installing throughout a forest, but in your studio you may want something hooked into your setup to record or route to different effects. The way to do this is to boot up an Alles speaker (or many!) on your computer directly. If your computer is on the same network as your speakers, the programs will act just like all the other speakers in the mesh, and should stay in sync.
All you have to do is compile the program called alles and run it locally. It's the same code as gets booted on the speaker, just running on your computer instead. If you've followed the setup instructions, just
cd main
make
./alles
Multicast IF is 192.168.1.85. Client tag (not ID) is 1. Listening on 232.10.11.12:9294
Using device ID 2, device Studio 1824c, channel -1  (all)
Now any message sent to the mesh will also play out your default audio output.
Alles on the desktop has some optional startup parameters to help you run them on different networks and set the output to different sound cards. For example, I can have one Alles speaker running on each output of my 18-output USB audio interface!
./alles -h
usage: alles
    [-i multicast interface ip address, default, autodetect]
    [-d sound device id, use -l to list, default, autodetect]
    [-c sound channel, default -1 for all channels on device]
    [-o offset for client ID, use for multiple copies of this program on the same host, default is 0]
    [-l list all sound devices and exit]
    [-h show this help and exit]
If you want to run multiple Alleses on one machine, you can set the IP address and "client offset" like so:
./alles -i 192.168.1.85 -o 100 -c 0
# in a new tab in Terminal.app
./alles -i 192.168.1.85 -o 101 -c 1
# ... and so on
You'll want to set client offset to a number that won't conflict with other devices on your network; here, my assumed client offset is 85 (the last # of the IP address), but I'm adding 100 to it for the first speaker, and 101 to it for the second, and so on. That ensures that another device on my network won't steal it. In practice you'll have a private network (use the -i parameter to set the source IP for it) so this is less of a concern, but something to keep in mind when composing at home.
Docker container for Alles production
These scripts build the Alles firmwware in a container, using a fully isloated ESP-IDF toolchain.
To build it, you'll need a Linux computer with Docker installed. Any OS capable of running Docker can work to build the image, however a Linux-based system is required to flash devices through the container.
You will aslo need make and git; you can install them on Ubuntu like so:
sudo apt update
sudo apt install build-essential git
Once you have these prerequisites, clone the repository, then build the Docker image:
git clone https://github.com/blinkinlabs/alles.git
cd alles/docker
make build-docker
This will take a little while. Once it is done, you can build the firmware in the container:
make build
Once the firmware is built, flash an attached Alles device:
make flash
Note: The above assumes that the USB-to-serial converter in the Alles was detected as /dev/ttyUSB0; if it was mounted somewhere else, you can specify the position:
PORT=/dev/ttyXXXX make flash
Source and license
Original documentation: Brian Whitman, Shore Pine and contributors. Reproduced under MIT. Individual image credits identify any separately licensed media. The full original copyright and permission notice is retained in that license file.
Republished the complete reviewed README and build chapters. Reformatted HTML as Markdown, resolved relative links, and served repository images locally. Photos resized without cropping; diagrams retain source resolution. Externally hosted or separately unverified media is linked at its original location. Introductory selection notes are by Meteor Makers; the original author is not responsible for those notes. Combined source chapters in build order and remapped chapter links to this page.
Source revision: 9fd201fcd5b7. Retrieved 2026-10-03. This is a source snapshot, not a claim that the project was first published today or that its creator endorses Meteor Makers.